Introduction
BetterBottle PET carboys and fittings have a great many
advantages when compared with glass carboys. Advantages such as safety,
light weight, and ease of cleaning are obvious and result in automatic
benefits; however, many other advantages are of no benefit unless they are
actively applied. The following tips explain how to apply BetterBottle
products to their best advantage. Use the tabs to the left of this page
for detailed information about the installation and maintenance of
specific items.
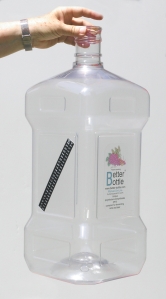
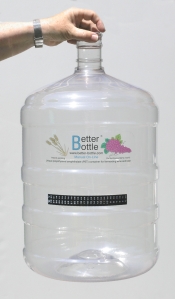
Handles
Lifting a
filled 5 gallon carboy by its neck will apply a tensile (stretching) force
of at least 55 lbs (~24 Kg) to the narrowest part of the neck. Glass
carboy should never be lifted by handles attached to their necks,
especially when they are full, because the tensile (pulling) strength of
glass is not predictable. Glass that has been scratched or etched (i.e.,
washed with caustic detergents) is especially likely to crack. However,
the necks and shoulders of BetterBottle carboys are designed for high
tensile forces. Handles make moving filled carboys much easier and
BetterBottle recommends several. Use the Handles tab to the
left of this page for specific information about
handles.
When a BetterBottle carboy is
raised off a surface by lifting its neck, the weight of the contained
liquid will cause the carboy to flex slightly. This flexing can suck
liquid out of liquid-filled air locks. BetterBottle recommends using
DryTrap air locks. Alternatively, the outlet of a liquid-filled air lock
can be closed off with a stopper when a carboy is being lifted. Use the
DryTrap
tab to the left of this page for specific information about DryTrap air
locks.
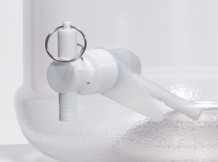
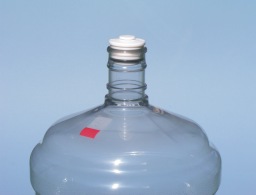
Closures
Vinyl caps
and #10 stoppers fit the necks of BetterBottle carboys better than they
fit the often irregular necks of glass carboys; however, these soft
closures suffer from numerous drawbacks, primarily related to flavor
scalping (adding undesirable flavors). Use the Technical tab at the
top of the page to learn more about flavor scalping. BetterBottle
Universal and the Big Blow closures are made of PET. They do
not scalp flavors and use Teflon-encapsulated ,Viton O-rings to create
precision seals that require no lubrication. BetterBottle closures are
also designed to make it easy to rack under the low-oxygen, or
oxygen-free, conditions described below. Use the Closures tab to the
left of this page for more detailed information.
|
Labeling
 |
|
Plastic post-it labels, which are available
in a variety of colors, or easy-release masking tape (usually blue
or green) make convenient, easily removed identification labels.
Plastic cable ties, which are also available in a variety of colors,
make color coding easy and can be used to attach tags to the necks
of the carboys. Fast-drying marking pens of the sort used to label
CDs or DVDs can also be used and the writing can be removed with
ethanol. Do not experiment with other solvents; they may cause
Environmental Stress Cracking (ESC). See the Wash/Sanitize
and Materials sections under the Technical tab
at the top of this page for additional information about
ESC.
|
A typical, 2 cm X 16 cm, dual-scale (4°C -
28°C / 39°F - 82°F) liquid crystal strip will fit all three sizes of
BetterBottle carboys. Furthermore, testing by BetterBottle indicates
that the special PET used to make BetterBottle carboys conducts heat
sufficiently well so the strips can indicate the temperature of the
contained liquid within a fraction of a degree, even when the
ambient temperature is 20°C higher or lower. In fact, strips can be
attached to BetterBottle carboys with clear tape, leaving the paper
liner that protects the adhesive of the strips in place, without
affecting the accuracy of the strips to a significant extent. The
tape should be just a little wider than the strips, so the strips
are held firmly to the surface of the carboys. It is easy to remove
strips attached with clear tape and the clear tape comes off the
smooth face of most strips very easily.
As a general rule,
it is wise to calibrate strips when
controlling temperatures to within a relatively narrow range is
critical. |
|
  |
|
Filling
Before
filling a BetterBottle carboy with juice or wort the carboy should be
washed, sanitized, and rinsed. Use the Technical tab at the
top of this page for specific information and tips about cleaning and
sanitizing. If the carboy is equipped with a Racking Adapter and SimpleFlo
valve, test the seals by filling the carboy with water. Use the
Racking Adapter tab to the left of this page for troubleshooting
information.
Very Important Brewer's
Note: Pour a generous portion of the cold
diluting water to the BetterBottle carboy before adding the wort and be
very certain that the wort has been chilled so it is cool to the touch.
Mix the wort with the water right away (see
Mixing/Oxygenating/Degassing below). Do Not chill hot wort
in BetterBottle carboys and do not pour undiluted wort into BetterBottle
carboys – doing so appears to promote environmental stress cracking (ESC).
For more details about ESC, see the Wash/Sanitize section, under
the Technical tab at the top of this page.
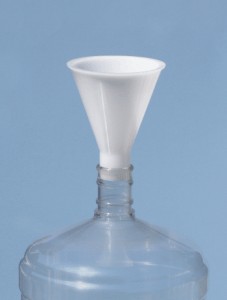
BetterBottle offers a sturdy funnel that fits snugly into the
wide necks of all BetterBottle carboys. There is no bubbling around the
stem during fast filling and none of the slopping that occurs when funnels
rock back and forth. Use the Closures
& Funnel tab to the left of this
page for additional information.
Sudden
temperature changes will not cause BetterBottle carboys to crack the way a
glass carboy does. However, do no fill BetterBottle carboys with liquids
that are above 60°C (140°F). At 60° C, skin will be burned severely in
about 6 seconds and higher temperatures will not give time to react.
Furthermore, higher temperatures can damage the carboys. See the
Materials section under the Technical tab at the
top of this page for additional safety and materials
information.
|
Using Liquid Crystal Temperature
Strips
A typical, 2 cm X 16 cm,
dual-scale (4°C - 28°C / 39°F - 82°F) liquid crystal strip will fit all
three sizes of BetterBottle carboys. Furthermore, testing by BetterBottle
indicates that the special PET used to make BetterBottle carboys conducts
heat sufficiently well so the strips can indicate the temperature of the
contained liquid within a fraction of a degree, even when the ambient
temperature is 20°C higher or lower.
|
Mixing/Oxygenating/Degassing
Agitating the unsettled contents of BetterBottle carboys in
order to mix ingredients, add oxygen, or remove CO2 is very
simple and, in contrast to glass carboys, no special equipment is
required. If the wine or beer has already been settled in preparation for
racking, slapping the side of the BetterBottle carboy will cause shock
waves that will drive CO2 out of the liquid and hasten the
settling of low density suspended or clinging solids – without
significantly disturbing the sediment on the bottom of the carboy. To
prevent oxygen contamination during degassing, carboys should be closed or
equipped with a DryTrap air lock. Use the DryTrap tab to the
left of this page for detailed information.
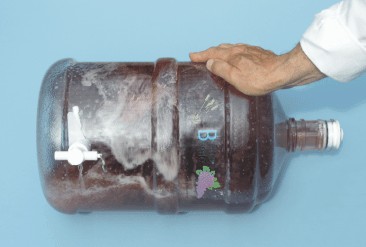 |
| A BetterBottle carboy can be
placed on a cloth or towel and shaken (short rolls) back and forth
to slosh the contents vigorously with very little effort. Leave
extra head space during initial mixing and aeration to maximize
agitation. Tune your rocking motion for the desired effect; very
hard rocking may result in less efficient mixing than more gentle
rocking. |
 |
|
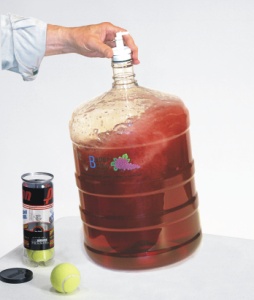 |
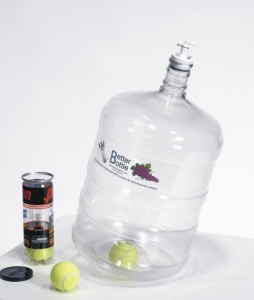
| Swirling the contents
of a BetterBottle carboy vigorously requires almost no effort, if a
tennis ball is placed in the punt space under the carboy. Do not
tilt the carboy by so much that the edge of the carboy's base
touches the surface (see Important Note). And perform the swirling
on a smooth or soft surface for good measure. Leave extra head space
during initial mixing and aeration to maximize agitation. Tune your
swirling motion for the desired effect; very hard swirling may
result in less efficient mixing than more gentle swirling.
Important Note:
Never rock or swirl BetterBottle carboys without using a tennis
ball. Doing so will cause the edges of the bottom of the carboy to
repeatedly crease and flex, causing a great deal of stress in the
PET that may eventually cause cracks, like bending a paper clip back
and forth. |
Fermenting
When a
carboy is equipped with a Racking Adapter, the adapter should be adjusted
so the stem angles slightly downward (hour hand at about 3:30 or 8:30)
during fermentations in order to prevent solids from settling into the
bore of the stem. If an adapter or valve does become blocked, there are
simple procedures for clearing it (See Racking below).
BetterBottle carboys are well suited for primary fermentation
as well as secondary fermentation and clarification. There are a number of
advantages to performing primary fermentations in BetterBottle carboys
rather than plastic pails: 1) BetterBottle carboys are clear, so it is
possible to see how a fermentation is proceeding and to rack more
effectively; 2) The tapered shoulder of the carboy results in better
removal of foam, which can contain undesirable components (e.g., volatiles
and denatured substances) that are best removed (i.e., kraeusen); and 3)
Plastic pails are injection molded and are likely to be made of materials
that impart, or carry over, strong flavors.
Wine and beer kits may call for primary volumes that fill
BetterBottle containers so full that the surface area is insufficient for
the initial aerobic stage of fermentation or even modest foaming would
cause excessive loss of liquid. In these cases, begin primary fermentation
under slightly concentrated conditions and dilute to the recommended
volumes once the initial rapid fermentation subsides.
Many juices produce only a modest foam during primary
fermentation and there is no need for a blow hose. However, if foam rises
to the point that it would enter the air lock, switch to a blow hose until
the foam subsides. BetterBottle Universal Closures will accept an 11 mm
(1/2") OD tubing, which should serve nicely as a blow hose for even the
most foamy strained juices. Juices and worts that contain solids are
likely to require a larger opening; the BetterBottle Big Blow Closure is
designed for these cases. Use the Closures & Funnel tab to the left of this page for information about blow
hoses. BetterBottle recommends keeping blow hoses as short as possible and
placing their open ends into a small, short glass in a sink or basin.
Liquid in the glass will serve as a trap and overflow will run into the
sink, where it can be easily rinsed away, or into the basin. As soon as
foam no longer rises into the neck of the carboy, replace the blow hose
with an air lock, preferably a BetterBottle DryTrap. DryTrap air locks are
particularly well suited for use with BetterBottle carboys; they will no
blow out or suck back and they can play an important role during racking
(see below). Use the DryTrap tab to the
left of this page for specific information about DryTrap air locks.
In order to minimize the number of times
a carboy is opened during fermentation, BetterBottle recommends placing a
hygrometer in the carboy when the air lock is installed. If a carboy is
equipped with a Racking Adapter and SimpleFlo valve, test samples of the
wine or beer can be drawn through the valve.
If solid items (e.g., oak chips, elderberry, etc.) are added
for flavoring, BetterBottle suggests placing them in a winemaker's tea
bag to prevent them from floating above the sediment and being
transferred during racking.
Racking
Racking wine
or beer can certainly be done in a traditional fashion with siphons or
pumps, using plain BetterBottle carboys. However, BetterBottle Adapters
and SimpleFlo valves make racking far more convenient. They also make it
simple to rack under, closed-loop conditions to reduce, or
eliminate, oxygen contamination. It is essentially impossible to perform
closed-loop racking with siphons.
Use the
Racking Adapters and SimpleFlo
Valve tabs to the left of this page for
detailed information about these components and the connection of tubings.
Use the Tubing tab to the left of this page for information about PET-lined
tubing. Unlike conventional tubing, this special tubing does not scalp
flavors and is exceptionally easy to sanitize.
The following sub-sections provide suggestions for
performing: 1) Pail-to-carboy, open racking; 2) Carboy-to-carboy,
low-oxygen, closed-loop racking; and 3) Carboy-to-carboy, oxygen-free,
closed-loop racking. The steps for the three approaches are so
similar that they could be integrated; however, in the interests of
clarity and because there are so few steps, each of the approaches is
described independently.
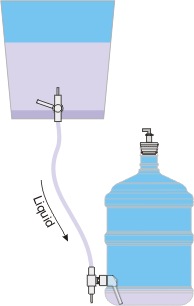
In all three
approaches, the bottom of the full (input) carboy, or pail, should be
positioned well above the top of the output (empty) carboy. When the input
carboy, or pail, is placed on a 1 meter (39 inches) high counter and the
empty carboy is placed on the floor, the wine or beer will flow at about
2.5 liters/min using 1/4" ID PET-lined tubing and 4 liters/min using 3/8"
ID tubing. BetterBottle recommends using the smaller ID tubing and taking
a couple extra minutes, because racking too quickly only makes it
difficult to rack cleanly.
Important: Racking flow will
be greatly reduced if a bubble of gas becomes trapped in the tubing
through which liquid is being transferred. In the case of 1/4" ID
PET-lined tubing, the gas in the transfer tubing will essentially always
be pushed out by the flow of liquid. Sometimes, gas will trap in 3/8"
PET-lined tubing, but it can be coaxed out by tapping the tubing at
various points while the liquid is flowing. Removing trapped gas from 1/2"
ID siphon tubing can be a nuisance.
|
|
Pail-to-Carboy (Open)
Racking
Racking from a pail,
fitted with a BetterBottle Pail Adapter and SimpleFlo valve, into a
BetterBottle carboy, fitted with a Racking Adapter and SimpleFlo
valve, entails little more than connecting a tubing.
 |
- Prepare a sanitized output (empty)
carboy and insert a sanitized DryTrap air lock.
- If there is any doubt about whether
or not the outlets of the SimpleFlo valves are sanitized when you
are ready to begin racking, take a moment to sanitize and rinse
them. The valves can be rotated, so it is easy to sanitize and
rinse their outlets with a small squirt bottle or a dropper. A
sponge or cup can be used to catch drips. Rotate the outlets of
the valves downward to drain any residual rinse water.
- Rotate the Racking Adapter of the
carboy so the opening of the adapter's internal stem is pointed
downward, but not quite straight down.
- Prepare an appropriate length of
sanitized transfer tubing and connect the valves together.
Refer to the schematic drawing to the right. The transfer
tubing should be just a little longer than necessary to make
the connection. The valves can be rotated to prevent interference
with the surfaces on which the pail and carboy have been placed
and to minimize the length of tubing required.
- Open the valves to permit the wine
or beer to transfer from the pail into the carboy.
- If there is only a little sediment
in the pail, tilt the pail slightly to recover more clear
liquid.
- To recover the liquid remaining in
the transfer tubing at the end of
racking:
- Close the output carboy's
SimpleFlo valve and press down lightly on the shoulder of the
carboy for a moment to expel some air from the carboy through
the DryTrap air lock (a one-way valve); thereby, creating a
slight vacuum inside the carboy.
- Partially open the carboy valve
until the liquid remaining in the tubing has been drawn into the
output carboy. If some liquid remains in the tubing, repeat
these last two steps.
Carboy-to-Carboy
(Closed-Loop) Racking
Racking between two BetterBottle carboys, fitted with
Racking Adapters and SimpleFlo valves, can be done in exactly the
same open manner as racking from a pail to a carboy. However, the
adapters and valves make it so easy to rack between carboys under
closed-loop conditions that there is no reason to rack any
other way. Racking under low-oxygen, closed-loop conditions
requires no advanced planning or preparation, and racking under
oxygen-free, closed-loop conditions requires only minimal
advanced planning and preparation.
|
Low Oxygen
All you need in order to rack under low-oxygen,
closed-loop conditions is two short lengths of
tubing.
Simple
Closed-Loop Racking
- Prepare a sanitized output
(empty) carboy and insert a sanitized DryTrap air
lock.
- If there is any doubt about
whether or not the outlets of the SimpleFlo valves are
sanitized when you are ready to begin racking, take a moment
to sanitize and rinse them. The valves can be rotated, so it
is easy to sanitize and rinse their outlets with a small
squirt bottle or a dropper. A sponge or cup can be used to
catch drips. Rotate the outlets of the valves downward to
drain any residual rinse water.
- Rotate the Racking Adapter of
the input (full) carboy to position the opening of the
adapter's internal stem about 1" (2.5 cm) above the sediment
layer.
- Rotate the Racking Adapter of
the output carboy so the opening of the adapter's internal
stem is pointed downward, but not quite straight
down.
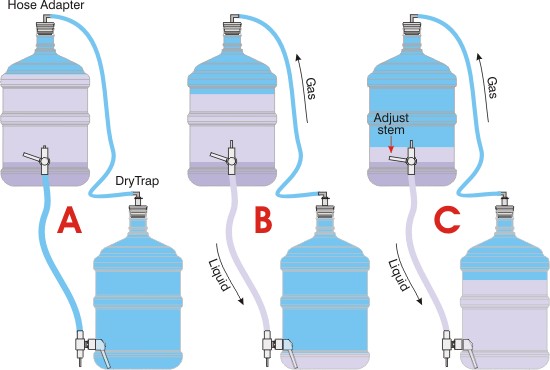
- Prepare an appropriate length
of sanitized transfer tubing and connect the valves
together. Refer to step "A" in the schematic drawing above.
The transfer tubing should be just a little longer
than necessary to make the connection. The valves can be
rotated to prevent interference with the surfaces on which
the carboys have been placed and to minimize the length of
tubing required.
- Prepare a sanitized
pressure balancing tubing with a 90° hose barb
closure adapter at one end, using an appropriate length of
1/4" ID tubing, and connect the port of the input carboy's
closure to the hose barb of the DryTrap installed in the
output carboy. Refer to step "A" in the schematic drawing
above.
- Open the valves to permit the
wine or beer to transfer. Refer to step "B" in the schematic
drawing above.
- When the level of the
clarified liquid in the input carboy approaches the stem of
the Racking Adapter, rotate the stem slowly downward until
it is just above the point where sediment would start to be
drawn up. Refer to step "C" in the schematic drawing above.
Closing the valve somewhat will reduce the flow rate and
permit you to position the stem closer to the sediment
layer. If flow breaks off before all of the clarified liquid
has been recovered, you can position the stem a little lower
and easily restart the flow, even if it does not start
spontaneously.
- To restart flow that breaks
off before racking is complete and when the liquid level is
too low to flow spontaneously, or to recover the liquid
remaining in the transfer tubing at the end of
racking:
- Close the output carboy's
SimpleFlo valve and press down lightly on the shoulder of
the carboy for a moment to expel some air from the carboy
through the DryTrap air lock (a one-way valve); thereby,
creating a slight vacuum inside the output carboy.
- Partially open the carboy
valve until the liquid remaining in the tubing has been
drawn into the output carboy. If some liquid remains in
the tubing, repeat these last two
steps.
|
|
Oxygen Free
All you need in order to rack under oxygen-free,
closed-loop conditions is two short lengths of tubing
and a way of purging the oxygen from the output (empty) carboy.
The cost of renting a tank of a dense purge gas (e.g., argon,
nitrogen, or CO2) and a pressure regulator is not
great; however low-pressure CO2 costs very little,
if anything. Inexpensive dry ice (solid CO2) is
readily available from ice cream shops and many supermarkets.
However, fermenting 20 liters of wine or beer to an ethanol
concentration of 5% (ABV) will produce about 380 liters of
CO2, way more than necessary to purge a carboy –
free of charge.
Note: Before using dry ice, learn about handling it
safely and follow good safety practices. Sixty grams (~2 oz)
of dry ice, a chunk about the size of a large standard ice
cube (3.5 cm X 3.5 cm X 3.5 cm), will sublime (evaporate) to
produce approximately 45 liters of CO2, enough to
purge a closed-loop very nicely. The dry ice can be
broken up and placed in a relatively small, wide-mouth,
transparent, plastic bottle, equipped with a closure to which
a 1/2" ID tubing can be attached. Do
not use a glass or metal container and be sure pressure cannot
build up! To increase the rate at
which the dry ice evaporates, the bottle can be warmed gently
by placing it in warm water. Dry ice should not damage
BetterBottle carboys; however, BetterBottle recommends that
dry ice not be placed directly into the output carboy, because
commercial dry ice may contain solid contaminants (e.g., dust,
bits of paper, etc.)
The purge gas should be introduced
through the valve of the output carboy, because recommended
purge gases are more dense than oxygen and purging will be
somewhat more efficient. The configuration of the tubings
during the purging stage depends on the source of purge gas.
|
Fermentation CO2
– If the choice of gas is CO2 produced
during fermentation, a connection must be made from the
top of the input carboy to the valve of the output
carboy while fermentation remains very active.
Purged
Closed-Loop Racking (Fermentation
CO2)
- Prepare a sanitized
output (empty) carboy and insert a sanitized DryTrap
air lock.
- When you are ready to
begin purging, if there is any doubt about whether or
not the outlet of the SimpleFlo valve attached to the
output carboy is sanitized, take a moment to sanitize
and rinse it. The valve can be rotated, so it is easy
to sanitize and rinse its outlets with a small squirt
bottle or a dropper. A sponge or cup can be used to
catch drips. Rotate the outlet of the valve downward
to drain any residual rinse water.
- Rotate the output
carboy's Racking Adapter so the opening of the
adapter's internal stem is pointed downward, but not
quite straight down.
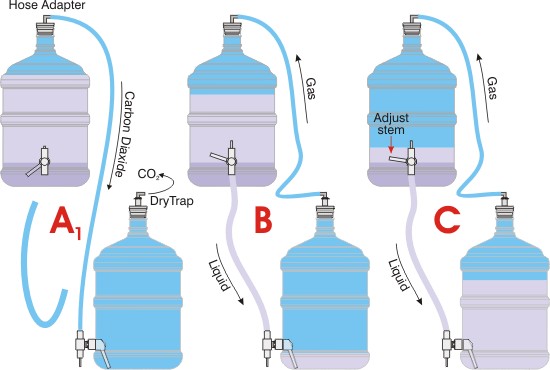
- Prepare a sanitized
pressure balancing tubing with a 90° hose barb
closure adapter at one end, using an appropriate
length of 1/4" ID tubing; connect the port of the
input (full) carboy's closure to the output carboy's
valve by pushing the tubing into the ID of the valve's
output; and open the valve. Refer to step
"A1" in the schematic drawing above. As the
DryTrap valve opens and closes with the flow of
CO2, it makes a gentle clicking, which
serves as a simple indicator that fermentation remains
active.
- When it is time to rack,
rotate the Racking Adapter of the input carboy to
position the opening of the adapter's internal stem
about 1" (2.5 cm) above the sediment layer. Refer to
step "B" in the schematic drawing above.
- Close the output
carboy's valve connect the end of the pressure
balancing tubing to the hose barb of the DryTrap
installed in the output carboy. Refer to step "B" in
the schematic drawing above.
- Re-sanitize the outlet
of the output carboy's valve.
- Prepare an appropriate
length of sanitized transfer tubing and connect
the valves of the input and output carboys together.
Refer to step "B" in the schematic drawing above. The
transfer tubing should be just a little longer
than necessary to make the connection. The valves can
be rotated to prevent interference with the surfaces
on which the carboys have been placed and to minimize
the length of tubing required.
- Open the valves to
permit the wine or beer to transfer.
- When the level of the
clarified liquid in the input carboy approaches the
stem of the Racking Adapter, rotate the stem slowly
downward until it is just above the point where
sediment would start to be drawn up. Refer to step "C"
in the schematic drawing above. Closing the valve
somewhat will reduce the flow rate and permit you to
position the stem closer to the sediment layer. If
flow breaks off before all of the clarified liquid has
been recovered, you can position the stem a little
lower and easily restart the flow, even if it does not
start spontaneously.
- To restart flow that
breaks off before racking is complete and when the
liquid level is too low to flow spontaneously, or to
recover the liquid remaining in the transfer
tubing at the end of racking:
- Close the output
carboy's SimpleFlo valve and press down lightly on
the shoulder of the carboy for a moment to expel
some air from the carboy through the DryTrap air
lock (a one-way valve); thereby, creating a slight
vacuum inside the output carboy.
- Partially open the
carboy valve until the liquid remaining in the
tubing has been drawn into the output carboy. If
some liquid remains in the tubing, repeat these last
two steps.
External Purge Gas – When
the source of purge gas is external, arranging to have
the gas available is the only preparation
required.
Purged
Closed-Loop Racking (External Purge
Gas)
- Prepare a sanitized
output (empty) carboy and insert a sanitized DryTrap
air lock.
- When you are ready to
begin racking, if there is any doubt about whether or
not the outlets of the SimpleFlo valves are sanitized,
take a moment to sanitize and rinse them. The valves
can be rotated, so it is easy to sanitize and rinse
their outlets with a small squirt bottle or a dropper.
A sponge or cup can be used to catch drips. Rotate the
outlets of the valves downward to drain out any
residual rinse water.
- Rotate the Racking
Adapter of the input (full) carboy to position the
opening of the adapter's internal stem about 1" (2.5
cm) above the sediment layer.
- Rotate the Racking
Adapter of a sanitized output carboy so the opening of
the adapter's internal stem is pointed downward, but
not quite straight down.
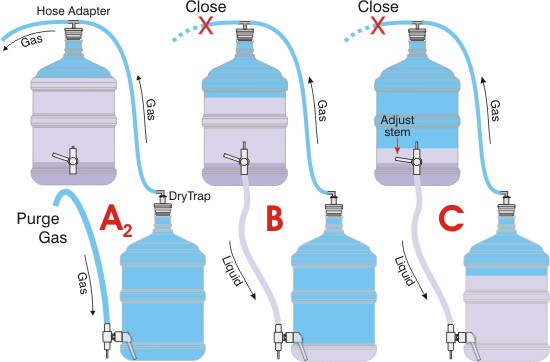
- Prepare a length of
sanitized transfer tubing that is just a little
longer than necessary to connect the input and output
carboys' valves together and connect one end to the
output carboy's valve. Refer to step "A2"
in the schematic drawing above. The valves can be
rotated to prevent interference with the surfaces on
which the carboys have been placed and to minimize the
length of tubing required.
- Prepare a sanitized
pressure balancing tubing with a "T" hose barb
closure adapter at one end, using an appropriate
length of 1/4" ID tubing, and connect the port of the
input carboy's closure to the hose barb of the DryTrap
installed in the output carboy. Refer to step
"A2" in the schematic drawing above.
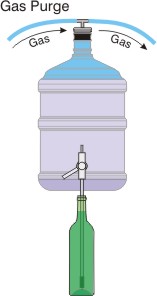
- Be sure the output
carboy's valve is open and connect the source of purge
gas to the free end of the transfer tubing. Run
the equivalent of about 4 carboy volumes of purge gas
through the output carboy and pressure balancing
tubing.
- Turn off the flow of
purge gas, connect the free end of the transfer
tubing to the input carboy's valve, and close off
the open end of the "T" hose barb closure adapter in
the input carboy's closure. Refer to step "B" in the
schematic drawing above.
- Open the valves to
permit the wine or beer to transfer.
- When the level of the
clarified liquid in the input carboy approaches the
stem of the Racking Adapter, rotate the stem slowly
downward until it is just above the point where
sediment would start to be drawn up. Refer to step "C"
in the schematic drawing above. Closing the valve
somewhat will reduce the flow rate and permit you to
position the stem closer to the sediment layer. If
flow breaks off before all of the clarified liquid has
been recovered, you can position the stem a little
lower and easily restart the flow, even if it does not
start spontaneously.
- To restart flow that
breaks off before racking is complete and when the
liquid level is too low to flow spontaneously, or to
recover the liquid remaining in the transfer
tubing at the end of racking:
- Close the output
carboy's SimpleFlo valve and press down lightly on
the shoulder of the carboy for a moment to expel
some air from the carboy through the DryTrap air
lock (a one-way valve); thereby, creating a slight
vacuum inside the output carboy.
- Partially open the
carboy valve, until the remaining liquid has been
drawn into the output carboy. If some liquid remains
in the tubing, repeat these last two
steps.
| | | |
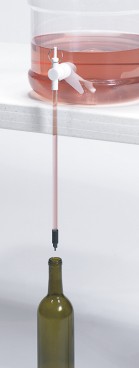 |
Bottling
BetterBottle SimpleFlo valves are designed so a
standard 3/8" bottling stem with a valve tip will fit into the
outlet. This makes it convenient to bottle and rack at the same time
– without any pumps or siphons. Contact with oxygen can be minimized
by maintaining an inert gas blanket over the wine or beer in the
BetterBottle carboy and flushing each bottle with the gas just
before it is filled. |
 |
Cleaning Up
BetterBottle carboys are more easily
washed and sanitized than glass carboys, because BetterBottle carboys are
so light weight and the surface of the special PET from which they are
made is non-porous and hydrophobic. For details see
the Wash/Sanitize section, under the Technical tab at the
top of this page.
Stiff brushes, abrasive scouring pads, and
cleansers should never be required, or
used.
|